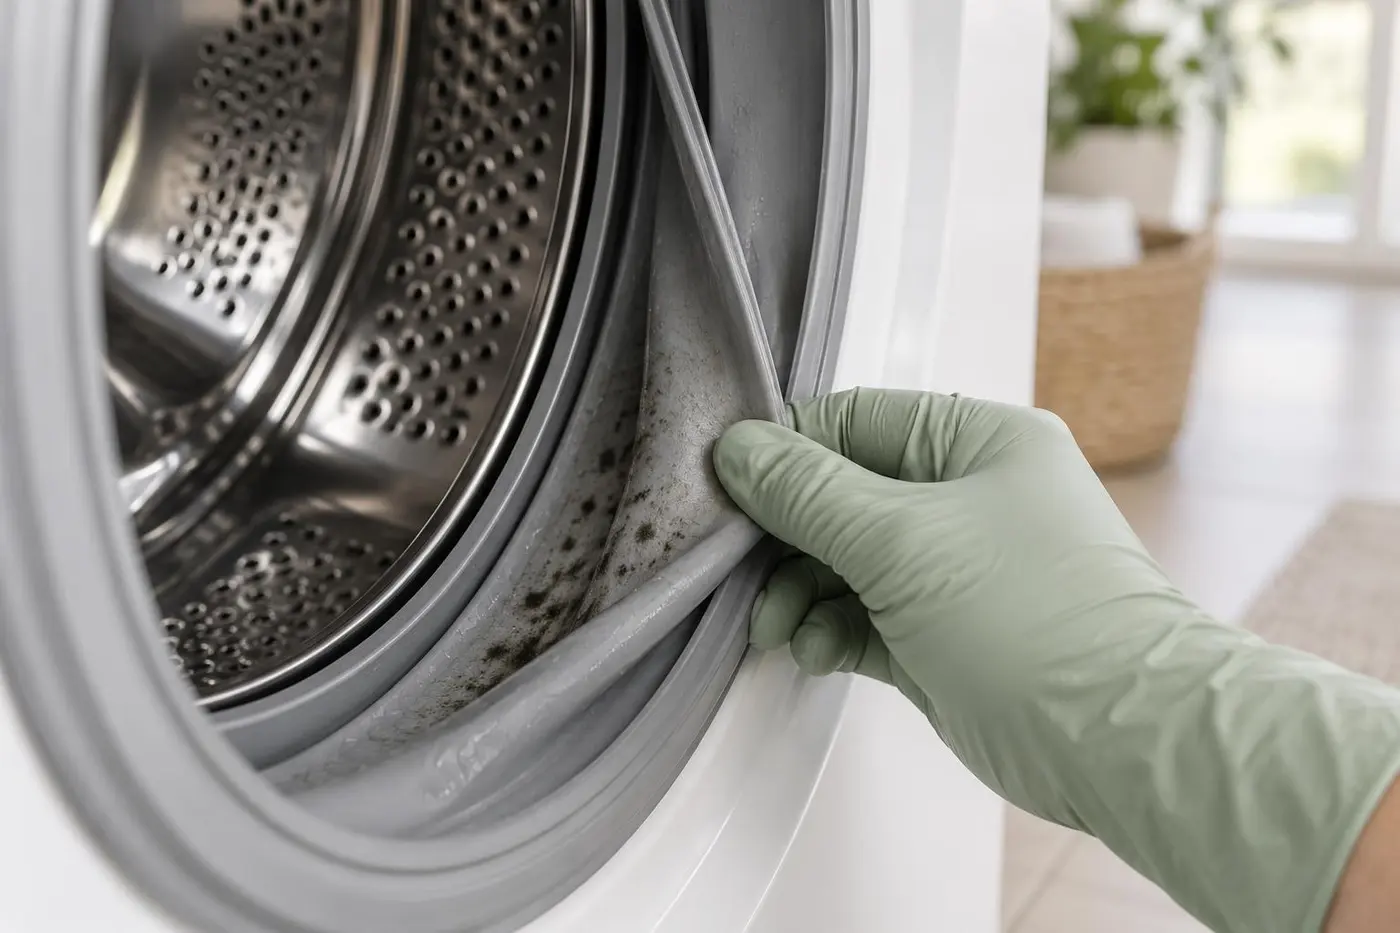
Finding black mold in washing machine door rubber makes steam look like an easy answer: point the nozzle, watch the marks lift, job done. That is the viral version. The real result depends on whether you are looking at loose grime, growth embedded in the gasket, or damaged rubber. Steam may loosen surface residue, but it cannot reverse staining inside the material. Some washer manuals also tell owners not to use a steam cleaner because moisture can reach electrical parts.
First decide whether it is dirt, mold or damaged rubber
Unplug the machine, put on gloves and gently open each fold of the door gasket. Look around the full circle, not only at the bit facing you. Hair, detergent sludge and standing water tend to collect at the six o'clock position and around the small drain holes. Check the lower edge of the door glass as well.
Try a small wipe test with a damp white cloth. If a grey or black film transfers to the cloth and leaves smooth rubber behind, much of the problem is removable buildup. If the surface feels clean but dark dots remain below it, the material may be permanently stained or the growth may have worked into the gasket. A split that opens when you flex the rubber is a different problem. Cleaning will not close it.
Before bringing out chemicals or a steam cleaner, check for:
- cracks, worn edges or pinholes;
- a hardened, warped area that no longer meets the glass;
- rust near the retaining wire;
- water appearing below the door during a wash.
I saw a useful example in a small Žižkov bathroom. The owner had scrubbed one dark line for weeks, assuming it was stubborn mold on washer seal rubber. It was actually the shadow inside a fine split. The leak appeared on the next wash. An inspection would have saved several rounds of cleaner and a lot of frustration.
What steam can do, and why it is not automatically safe
A steam cleaner for mold combines heat, moisture and pressure, but its effect on a washer gasket depends on the model and the condition of the rubber. It can soften detergent film, fabric softener residue and greasy grime in a fold. The catch is contact time. A fast pass across one small area is not the same as a validated treatment of the full gasket, and a strong jet may drive water and loosened dirt behind the seal.
Steam at the nozzle can be close to 100°C. Kärcher's guidance warns that heat may deform sensitive plastics and other materials; it also lists black mold and permanent discoloration among marks steam may not remove. A washer gasket copes with warm wash water, but a concentrated jet is a different load, especially when the rubber is old, hardened or already affected by harsh chemicals.
The rest of the appliance matters even more. Vapor can travel towards the door lock, control panel gaps or wiring more easily than a damp cloth. A Bosch washer manual says not to use a pressure washer or steam cleaner because penetrating moisture may cause a short circuit and damage the appliance. That does not prove every brief touch of steam will ruin a washer. It does mean a social video cannot override the manual for your exact model.
My rule is blunt: if the manufacturer does not specifically allow steam, I do not use it on the washer. Where a manual permits it, test a hidden spot first, use the lowest practical output and keep the nozzle away from the lock, panel seams and the space behind the gasket.
Start with the gentlest safe cleaning method
Remove the source of damp residue before chasing the black mark. With the machine unplugged, pick out hair, threads and small objects. Clear accessible gasket drain holes with a cotton swab or a blunt plastic tool, never metal wire. Remove and wash the detergent dispenser as your manual directs. If the pump filter has been ignored for months, inspect that too, with a shallow container and towels ready for the water.
To clean washing machine gasket buildup, begin with a soft cloth, lukewarm water and the product recommended for that model. Whirlpool advises an appliance-safe mild cleaner, a nonabrasive cloth or sponge, a thorough rinse and drying. LG recommends diluted oxygen or chlorine bleach for some machines, but the product and dilution vary between instructions. Do not borrow a concentration from someone else's washer video.
Work on a palm-sized section at a time. Do not stretch the gasket hard and skip wire wool or abrasive pads. Wipe the area several times with clean water, dry deep inside the fold, then leave the door open. If your manual calls for it, run an empty rinse before washing clothes again.
Never mix cleaning products. This includes the familiar home experiment involving vinegar and chlorine bleach. CDC guidance says household bleach should not be mixed with other cleaners or disinfectants because dangerous vapors can be released. Ventilate the room, read the label and follow the washer maker's directions.
Finish with a leak check. Run a short empty cycle and watch the lower door edge for the first few minutes. A bead of water left on the inside of the glass is one thing. Water escaping below the gasket or forming a puddle means stop the cycle and call a repair service.
Why a black mark can remain after the surface is clean
A hygienically clean gasket will not always return to pale grey. Mold and old detergent deposits can discolor rubber. When a fresh cloth stays clean, the surface is no longer slimy and the smell has gone, a stronger second treatment may achieve nothing except damage.
This is where people tend to go too far. Mild cleaner is followed by concentrated bleach, then mold remover, then steam because the photo still does not look perfect. Each round adds more chemical or heat exposure. LG also warns that undiluted bleach can deteriorate the gasket over time.
Give the machine two or three ordinary wash cycles after cleaning. Watch whether a slippery film returns, whether the drum or laundry smells, and whether the rubber remains flexible and watertight. A motionless shadow with no odor and no transfer to a cloth may simply be staining. New dots appearing within days suggest that moisture and residue remain elsewhere, perhaps in the dispenser, pump filter or drain path.
Replace the seal when cleaning no longer solves hygiene or function
People usually search replace washer door seal when the gasket has already split, started leaking, lost its shape or repeatedly grown heavy residue deep inside a fold. Those are sound reasons to replace it. The same applies if careful cleaning leaves the rubber sticky, crumbly or strongly odorous after several maintenance cycles. More cleaner cannot repair it.
This is not always a simple pull-and-push job. Most front loaders use an outer and inner retaining clamp. Reaching the inner one may require removing part of the front panel, aligning the drain holes and refitting a spring without pinching the gasket. A capable owner with the exact service procedure can do it. Use an authorised technician if the washer is under warranty, the seal connects to another hose, or the clamp arrangement is unfamiliar. Installation mistakes often stay hidden until the machine fills.
Do not stop at the new part. Clean the dispenser, pump filter and accessible drain route so the replacement is not exposed to the same residue. A technician should also check the door lock and confirm that the gasket sits evenly against the glass.
Drying and correct detergent dosing prevent a return
Remove wet laundry soon after the cycle. Wipe the lower gasket fold where water sits, and leave the door and dispenser slightly open so they can dry. This matters in a windowless Prague bathroom more than another dose of perfumed softener. Keep the door safely closed, though, if children or pets could climb into the drum.
Excess liquid detergent and softener leave a sticky film that traps dirt. Dose for local water hardness, load size and the product label rather than automatically filling the cap. Check the dispenser and seal every month. Run the maintenance cycle at the interval and temperature specified by the manufacturer; the stock advice to run 90°C every week does not suit every machine or household.
If recurring odor and bathroom buildup have turned into a bigger cleaning job, read what a Prague apartment cleaning can include, then send Čistýkout a no-obligation enquiry. We can help with cleaning around the appliance in Prague. Repairs and gasket replacement should stay with a qualified service technician for your washer brand.