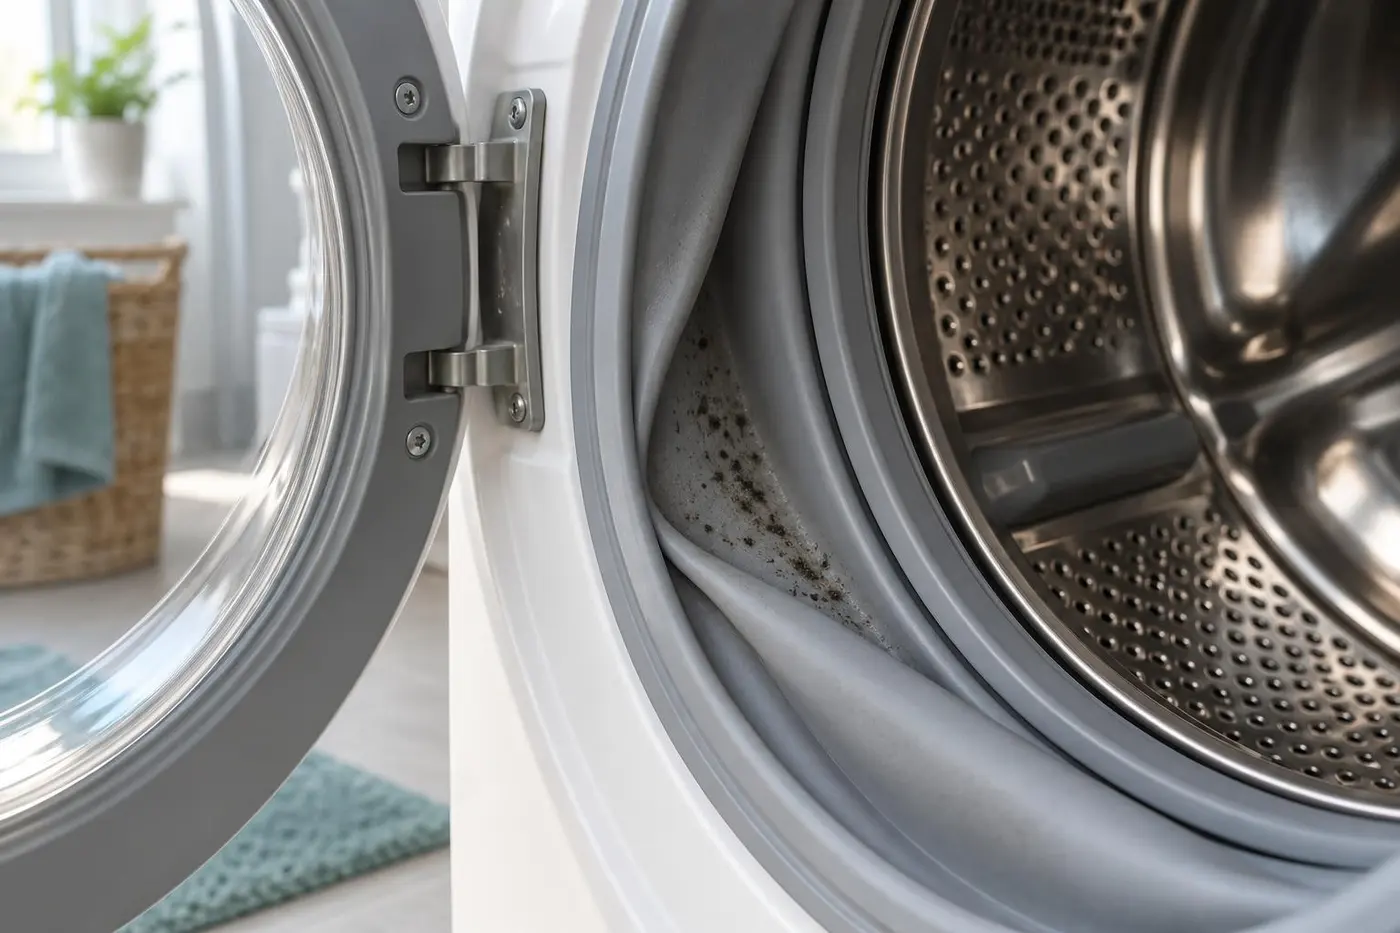
When mold in a washing machine seal returns after you have wiped it away, another round of vinegar is not a diagnosis. First work out whether the dark material is sitting on the surface or has become embedded in a damaged gasket. A greasy film made from detergent residue, lint and microbial growth can usually be removed. Black marks within the rubber, cracking, soft patches or a leak point toward replacement. That distinction can save you both needless scrubbing and a premature service call.
First check whether the problem is on the surface or inside the rubber
Empty the washer, switch it off and unplug it. Put on gloves, use a phone light and slowly open every fold of the gasket. The visible front lip is only part of it. The mess often sits at the six o'clock position, where water, hair, coins and the occasional small sock collect.
Black colour alone does not prove what you are looking at. Black spots on the washer seal may contain detergent, fibres, biofilm and mold growth together. You cannot identify a species by sight, and you do not need to. The useful questions are simpler: does the material transfer to a damp white cloth, and is the rubber underneath still smooth and resilient?
Try a small water-only test first:
- If grey or black residue comes off and the surface becomes lighter, much of the problem is removable buildup.
- If the rubber feels sound but fixed dots remain at the same depth, pigment may be embedded in the material. More scrubbing may not change its appearance.
- If the area crumbles, feels tacky, has gone unusually soft or shows cracks, cleaning cannot repair the part.
- If you find a cut, a distorted edge or a wet track where the gasket meets the glass, do not run the machine until it has been assessed.
I once checked a washer in a small Žižkov flat where only a few dots were visible from the front. Opening the lower fold revealed a layer of slippery residue and two blocked drain holes. The rubber itself was firm, so this was the better outcome: after cleaning and drying, the smell disappeared. An older washer in a windowless Vinohrady bathroom was different. The dots stayed visible when the rubber was stretched, the surface had become porous, and the musty smell returned within a week. Another bottle of cleaner would not have fixed that.
Inspect the contact area against the glass and the inner edge by the drum. A strand of hair or a strip of detergent residue can compromise the seal. Clear the lower drain holes with a soft cloth or only with a tool approved in the manual. Do not push wire into them. If the smell also comes from the drawer or filter, use our fuller guide to finding the source of washing machine odour.
Make one safe cleaning attempt, without a chemical cocktail
Find the care instructions for the exact model and read the section on the door gasket. Manufacturers do not all give the same advice. Bosch, for example, recommends a soft damp cloth and warns that chlorine cleaners can degrade the rubber. LG's front-loader guidance instead specifies a carefully diluted oxygen bleach solution and notes that instructions may vary by model. A ratio copied from a random video is therefore a poor substitute for your own manual.
Choose one compatible method. It might be water and a mild detergent, the manufacturer's own washer cleaner, or a solution explicitly listed in the instructions. Wear gloves, open a window or the bathroom door, and follow both the stated concentration and contact time. If the manual allows no chemical cleaner on the gasket, stick to a damp cloth.
Never combine chlorine bleach with vinegar, acids, toilet cleaner, ammonia or another cleaning product. Dangerous gases can be released. Doing one after the other is not a safe workaround if residue remains inside the fold. If you do not know what someone used before you, rinse the gasket with water, ventilate the room and postpone any chemical treatment.
Work in small sections. Dampen the cloth rather than pouring liquid into the fold, and do not spray cleaner into the machine's internal spaces. Wipe the front lip, every pocket and the contact surface. Avoid wire wool, knives and hard brushes. It is remarkably easy to turn a cosmetic stain into a real leak by damaging the rubber.
Judge the result only after rinsing and complete drying
When the specified contact time is over, use a clean water-dampened cloth to remove the product and loosened residue from the entire fold. Change the cloth or rinse it several times. Dry the gasket, especially the lower pocket and drain openings. If the manufacturer requires an empty rinse or maintenance cycle, run it without laundry.
Leave the door and detergent drawer ajar until everything is dry. In a Prague bathroom with no window, that can mean overnight rather than ten minutes. Keep children and pets away from the open machine while it airs.
The fragrance of a cleaner proves nothing. Look again once the rubber is dry and after the next few wash cycles. A quick photo of the same section makes comparison easier. Watch for three things:
- a dry surface with no slippery film,
- the return of a musty smell after one to three loads,
- fresh residue developing in the same spot.
A permanent grey shadow can remain even after effective cleaning. The mark alone does not automatically mean you must replace the washing machine door seal, provided the rubber is firm, dry, odour-free and the area is stable. The reverse is also true: a heavily fragranced washer with wet slime in the bottom fold is not clean.
Stop cleaning and arrange a replacement when the seal is damaged
End the home treatment if the same problem comes back soon after one correctly performed attempt. Repeated soaking in stronger products can harm the rubber and nearby metal without changing a stain that has penetrated the material.
It is time to replace the gasket or request service when any of these applies:
- black spots on the washer seal appear embedded, spread, or return quickly with the smell;
- the gasket is cracked, torn, warped, sticky or abnormally soft;
- the closed door leaks during a cycle;
- the drains, drawer and filter are clean but the washing machine still smells musty;
- growth or residue extends behind the fixed edge where you cannot reach it without dismantling the machine.
If you need to replace the washing machine door seal, order by the full model and production code on the appliance label, not by brand and approximate age. Two washers from the same range can use different profiles or retaining rings. Send the service company a photo of the label, the affected fold and any water track. That is a small step, but it can prevent a second visit caused by the wrong part.
Replacement videos make the job look tidy. In reality, an outer band and a strong inner spring often hold the gasket in place. A lip seated a few millimetres out can leak only when the machine fills or spins. I would use an authorised technician for a washer under warranty, a built-in model, or any job that requires removing the front panel. If water is already escaping, unplug the washer and close its supply valve.
After replacement, remove the cause as well as the damaged part
A new gasket can look like the old one within months if detergent-rich water keeps sitting in the lower fold. Dose detergent for the load, soil level and local water hardness. Prague's water hardness varies by supply zone, so "one full cap, just to be safe" is not a useful rule. Excess liquid detergent and fabric conditioner can leave more residue than the rinse removes.
After a load, remove trapped hair and wipe the small pool from the bottom pocket. Leave the door and drawer ajar so air can circulate. Run the maintenance programme at the interval and temperature stated by the manufacturer rather than inventing a hot cycle. Check the pump filter regularly, following the manual's method for disconnecting the appliance and draining residual water.
My practical rule is simple: if one safe attempt removes it from sound rubber, keep the gasket. If the problem returns from damaged material or affects the seal, call for service. A door gasket is not tile grout. Once it loses its shape or elasticity, a home remedy cannot put that back.
Checked safety and model-specific guidance
Always compare the method with the manual for your washer. For this article, we checked Bosch guidance for cleaning a rubber seal, LG guidance on mold in a door gasket, and the CDC warning not to mix bleach with other cleaners.
If the washer problem sits alongside a bathroom or flat that needs a thorough reset, you can send a no-obligation cleaning request through ČistýKout. It is a Prague-based option for the surrounding household clean; replacement of the appliance seal still belongs with a washer technician.